
Your First Steps with Aqsis
Overview
This is a simple introduction to Aqsis, which you can follow using only the tools in the Aqsis distribution and a text editor.
However, please be aware of the fact that Aqsis is a 3D graphics renderer only, and it is normally used in combination with some graphical 3D modeling software. Aqsis and its accompanying tools are command-line programs with a thin GUI on top, and there is no graphical front-end for content creation. You need additional software to create complicated scenes and animations.
Because Aqsis adheres to the RenderMan Interface, there are many 3D modeling and animation packages that can use Aqsis for rendering, ranging from high-end commercial software titles through free software alternatives, down to small and simple tools for specific purposes. We will not try to list any of the related software here, there is simply too much of it to make any sense in this context.
The input to Aqsis consists of three kinds of data:
- Scene descriptions
- Texture images
- Shader programs
Scene descriptions are saved in plain text files written in a special syntax called RIB (short for “RenderMan Interface Bytestream). A RIB file contains a number of frames (at least one) for rendering. Each frame includes an output file name, camera parameters, lights, transformations, limited motion information to compute motion blur, various objects built from a fairly large set of graphics primitives, object transformations, and names and parameters for materials.
Texture images are saved in the TIFF format and preprocessed by a texture preprocessor (teqser) to prepare them for use by the renderer (aqsis).
Shader programs are what makes the RenderMan Interface famous and so widely used. Instead of being limited to a set of pre-defined materials in the renderer, end users can write small programs in the RenderMan shading language (SL) to extend the renderer with new functionality, and to share that new functionality with others. Shader programs are compiled for use with the shader compiler aqsl.
A simple RIB scene
You are probably eager to get started rendering some images, so here’s a very simple RIB file to try.
##RenderMan RIB-Structure 1.0

FrameBegin 1

Display "simple.tif" "file" "rgba"
Format 640 480 -1
ShadingRate 1
Projection "perspective" "fov" [30]
FrameAspectRatio 1.33
Identity

# Default distant headlight
LightSource "distantlight" 1

# Camera transformation
Translate 0 0 5

WorldBegin

Identity

AttributeBegin

  Color [1.0 0.6 0.0] # A nice orange color
  Surface "plastic" "Ka" [1] "Kd" [0.5] "Ks" 1 "roughness" 0.1
  TransformBegin
    Rotate 90 1 0 0   # Rotate +z to +y. "Up" in default camera coordinates is +y,
    Sphere 1 -1 1 360 # but the Sphere primitive has its poles on the z axis.
  TransformEnd

AttributeEnd

WorldEnd

FrameEnd
You don’t have to understand every detail of the text above, just save it in a file named simple.rib and render your first image with the command:
aqsis -d simple.rib
(The option -d makes the image output appear on the screen instead of just being saved to a file.) The renderer should finish within a few seconds, and the output appears both on the display and as a TIFF file with the name simple.tif. Try rendering the simple scene above and see that it works.
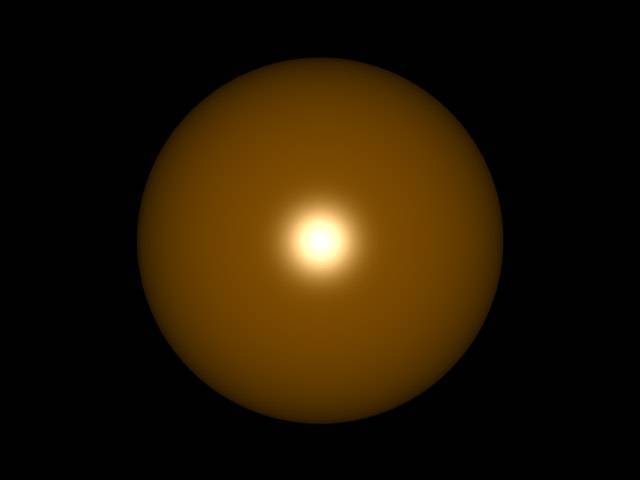
The scene is not very interesting, it is just an orange sphere in black empty space, but note that the sphere was specified as a single primitive, not as a large number of polygons, and that the rendered sphere is not faceted in any way and has a smooth outline. Aqsis supports a rich set of curved primitives in the RIB input, and it renders them without subdividing them into triangles first. 1
The RIB file has a very regular and quite simple structure: The camera and lights are defined, materials are defined, local transformations are made and objects are instantiated. The RIB syntax is not really intended to be written or read by humans, though. Simple scenes can be created with a plain text editor in a few short lines, as you saw from the simple example above, but a more complex scene with many primitives would be much too big and complicated to write by hand, and it is very difficult to find your way around in a large RIB file. RIB files are meant as a standardised intermediary format for communicating a scene description between modeling and animation software and the renderer, and they are normally written by automated software.
We will not go deeper into the details of the RIB syntax here. If you want to learn more about it, there is a lot of material available elsewhere. Some pointers to further information can be found in our FAQ section.
Shaders
Contrary to RIB files, which are primarily meant for automated creation and not easily read or written by humans, shader programs in the RenderMan Shading Langugage (SL)are meant to be written, read and edited by humans. The syntax of the language is similar to C, but it has some special data types to facilitate 3D vector arithmetic and color computations, and quite a lot of built-in functions to make the job of the shader programmer easier. Custom functions can be defined if needed, and loops, conditional expressions and other common language constructs are available and look more or less like their C counterparts. The SL syntax is simple, even a bit crude by modern standards, but straightforward and to the point. Most people who know some C-like programming language learn SL very quickly.
Shaders come in several different varieties:
- A surface shader defines the color, transparency, pattern and light reflection model for a surface. The surface shader can make use of texture images, but it does not have to – everything can be defined in terms of functions through program code. This approach is called procedural shading.
- A displacement shader can make an otherwise smooth and disinteresting surface appear bumpy, crinkled, or uneven in any other way.
- A light source shader defines the illumination properties of a light source.
- A volume shader determines what happens with light that passes through an object (or through the atmosphere).
- An imager shader can do per-pixel operations on the output image.
- Of these five types, surface and displacement shaders are by far the most commonly used ones. Together, a displacement and a surface shader provide an extremely flexible and totally general way of defining the detailed surface appearance of an object.
- A simple surface shader
To make our very simple example scene look a bit more interesting, let’s write a custom shader for the sphere and use it.
// A very simple SL surface shader
surface simple_surface() {
  Ci = noise(10*P);
}
Save the text above to a file named simple_surface.sl and compile it for use with Aqsis with the shader compiler aqsl:
aqsl simple_surface.sl
The output from the shader compilation is a file named simple_surface.slx that contains a version of the shader that is suitable for use during rendering. To attach the new material definition to the sphere in our scene, we simply change the Surface statement in the RIB file to:
Surface "simple_surface"
Now, re-render the scene with aqsis -d simple.rib and you will see a different image.
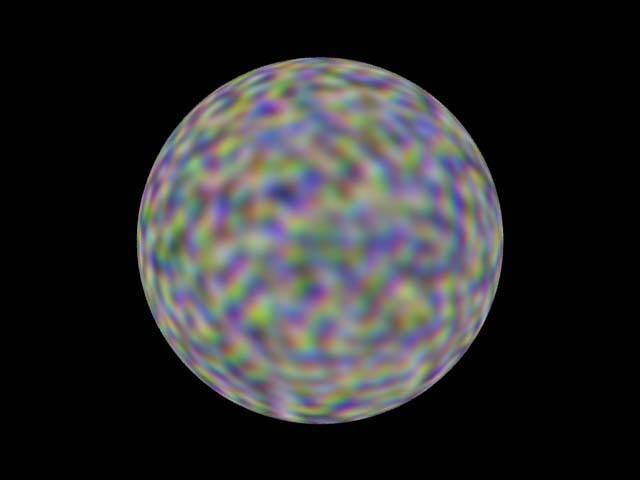
The sphere now has a blotchy Perlin noise pattern on its surface, which is exactly what we asked for in our shader. Also, it is no longer correctly lit, it has a constant brightness like it was lit by a full intensity ambient light. This is exactly what we asked for, too. Any material properties must be specified in the shader, including the reflection of light from the surface. We have not taken the light source into account in our shader code, so we don’t see any influence from it. This is undesirable, so let’s make the material a little more useful by taking lighting into account. A simple diffuse reflection model can be implemented easily in SL. Just change the shader to the following code:
// A very simple SL surface shader
surface simple_surface() {
  color Cd = noise(10*P);
  Ci = Cd * diffuse(N);
}
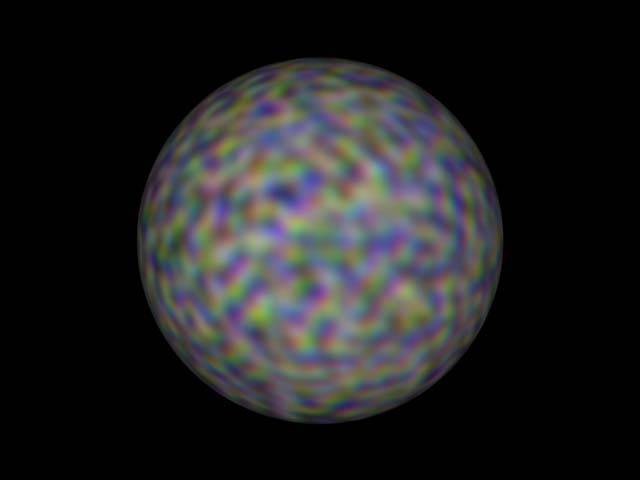
This is more along the lines of what a well-behaved surface shader should do: it should calculate a surface color based on surface position, and then modulate that surface color with a reflectance function that considers the position and intensity of each of the light sources in the scene. The function diffuse(N) is one of the convenient built-in functions in SL – it actually loops over all the active light sources, calculates the incident illumination from each and sums them up 2. This shader does not calculate any specular reflection, but that could be done fairly easily as well with the built-in function specular().
A simple displacement shader
Before we leave this introduction, we should at least try a displacement shader, because that’s where much of the fun begins with Aqsis. Displacement shaders are in separate files from surface shaders, also written in SL but with a slightly different purpose. While a surface shader is all about color, light and reflection, a displacement shader has absolutely nothing to do with color, its only concern is the position and orientation of the surface.
Many renderers allow changing only the surface normal in a material – this is commonly referred to as “bump mapping”. If bump mapping is all you can do in a shader, anything related to the actual shape of an object must be specified at the object level as geometric primitives.
A RenderMan-compliant renderer like Aqsis is a lot better in this respect. It allows the actual position of the point to be changed by a displacement shader, which gives the shader writer a lot more freedom to experiment and use the shader as a tool for actual geometric modeling. Many impressive and highly detailed 3D models have been made with displacement shaders playing a prominent part in the modeling process.
A displacement shader in SL moves the point by changing the global variable P. After the surface has been displaced, the surface normal N, also a global variable, needs to be recalculated. Without going into detail here, we simply mention that this can be done by another very convenient pre-defined function in SL, calculatenormal(P), with the new displaced point P as argument.
A simple but quite interesting displacement shader is this:
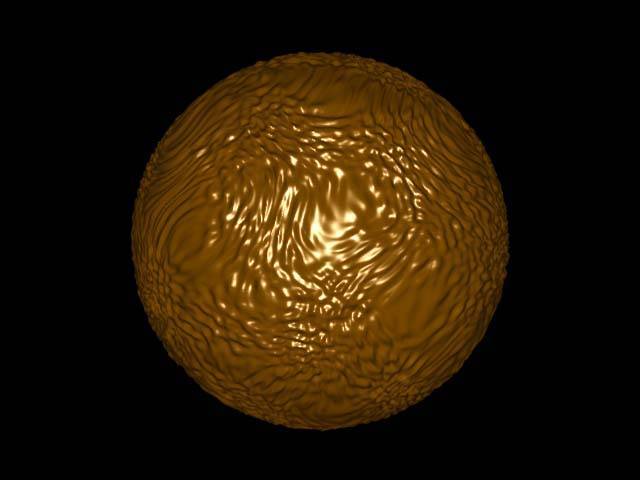
// A very simple SL displacement shader
displacement simple_displacement() {
  point Ptex = P + noise(P*2);
  P = P + N * 0.05 * float noise(20*Ptex);
  N = calculatenormal(P);
}
Save the text above to a file named simple_displacement.sl, and compile it with aqsl. Change the surface of the sphere in the RIB file back to the plain “plastic” material you had first, and associate the displacement shader with the sphere by the statement Displacement “simple_displacement” in the RIB file. You also need to add a statement to tell the renderer that the surface can move from its original position, or else there will be ugly cracks in the surface. The complete RIB code between AttributeBegin andAttributeEnd should be changed to:
Color [1.0 0.6 0.0] # A nice orange color
# Displacement bounds, important for correct rendering
Attribute "displacementbound" "float sphere" [0.1] "coordinatesystem" ["shader"]
Surface "plastic" "Ka" [1] "Kd" [0.5] "Ks" 1 "roughness" 0.1
Displacement "simple_displacement"
TransformBegin
  Rotate 90 1 0 0   # Make +z point "up". The default camera coordinate system has
  Sphere 1 -1 1 360 # +y up, but the Sphere primitive has its poles on the z axis.
TransformEnd
Now, render that RIB file with Aqsis and look at the result.
Where to go from here
As you can see from this very simple example, even simple shaders can yield a complex and interesting surface appearance. A well written shader or a set of shaders for a surface can make all the difference between bland, cheesy-looking 3D graphics and a professional quality image.
Shader programming can be frustrating, after all, it is programming, but for the most part, it is both fun and rewarding to go through the incremental process of getting a surface to look the way you want. It is a form of artistic programming based on visual thinking and with very concrete visual feedback, and it is often based on observations of natural phenomena and real world materials. Many people like this kind of work and are deeply fascinated by it.
The RenderMan Interface and SL are among the oldest standards in use in computer graphics, but there are no signs of it becoming obsolete yet. The standard is general enough to be able to include recent research results in surface reflection models, and shaders written in SL can be very complex and highly realistic. SL is very much alive and kicking, and we wish to welcome you into the art of SL shader programming.
For further information on SL, there are many sources available elsewhere. SL is a fairly simple language, so if you like to learn by example, you can start by looking in the Aqsis installation directory. All the default surfaces and light sources in Aqsis are in fact SL shaders, and they are supplied as SL source code.
More information can be found in our FAQ section. Have fun!
-
The curved primitives are subdivided, but that happens late in the rendering process, and the polygons end up being about the size of a single pixel. These final polygonal fragments are called micropolygons. ↩
-
Illumination for a point is actually evaluated by invoking the corresponding light source shader for each of the lights. ↩